How would you rate the overall quality of the product?
Very Low
Okay
Very Good
How would you rate the value of the product for the money?
Very Low
Okay
Very Good
How difficult or easy is the product to assemble, use, or operate?
Very Difficult
Average
Very Easy
How well does the product perform / function?
Very Weak
Okay
Very Good
“I received the model in great shape with no damage or defects. Planning to set up with electric power. Great quality and workmanship and no major wrinkles in the oracover. Will be a fun Springtime build. Due to the recent tornado in Tennessee, my model could not be delivered right away and was sent back to Motion RC. Thank You Devin in Customer Service for re-shipping to me quickly and set up a Sunday FedEx delivery. Thanks for going above and beyond !!”
How would you rate the overall quality of the product?
Very Low
Okay
Very Good
How would you rate the value of the product for the money?
Very Low
Okay
Very Good
How difficult or easy is the product to assemble, use, or operate?
Very Difficult
Average
Very Easy
How well does the product perform / function?
Very Weak
Okay
Very Good
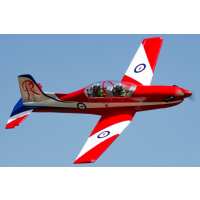
“First off, my PC-9 arrived in a very sturdy heavy duty box. The contents were very well packaged and protected and my first thought was, Wow, this is a big plane! Carefully removing all parts and inspecting them I was very impressed indeed. The craftsmanship was excellent and the covering was stunning with not one wrinkle to be ironed out!! All the nuts and bolts were methodically packed in zip lock bags.So far I am about 80% done. The instructions are clear and easy to follow. My only complaint is the hardware, it's rubbish. Soft metal metric screws that are as soft as butter. Should be of much better quality to match the rest of this beautifully crafted model.I went with the recommended retracts which are very easy to install and work like a charm. I've ordered the Admiral GP20 motor and will use 2-4S 5000 mAh batteries in series to power it.This is a beautiful looking plane that has been expertly built and finished. I can't wait to fly her...two thumbs up to Motion RC and Black Horse!!”
How would you rate the overall quality of the product?
Very Low
Okay
Very Good
How would you rate the value of the product for the money?
Very Low
Okay
Very Good
How difficult or easy is the product to assemble, use, or operate?
Very Difficult
Average
Very Easy
How well does the product perform / function?
Very Weak
Okay
Very Good
“The aircraft arrived well packaged and free of any defects. I originally purchased it with the intent on changing the scheme to the military grey with subdued markings, but decided against it with the help of my significant other highlighting that I have enough “grey military aircraft”. I tackled the landing gear first. Retract units weren’t available at the time of purchase so I had to use JP Hobby 90 size retract units and struts which come with brakes. In order to get these all to fit, I had to soft mount them to ensure the correct AoA on ground was efficient - which meant that the main gear struts had to be cut down and the nose gear modified to work. Additionally I had to fabricate a nose gear centering system out of small springs and washers so that the pull/pull style strut would center on gear retraction. I originally wanted to install nose gear doors, but due to my electric power choice and desire to keep weight low, I went with the included wheel well moldings on both the main and nose gear. I installed the moldings with clear waterproof silicone and had to slightly Dremel out the wing area to accommodate the main gear trailing link struts and wheels. I installed Hitec HS-5645 servos on the flaps and ailerons. I used Dubro pinned hinges on the ailerons vs the included superglue hinges. IMHO - those hinges aren’t meant to last and not a good choice on a plane of this size. When installed correctly, pinned hinges can have a minimal gaps as well. For the flaps I installed Fowler hinges on the underside in order to achieve a Fowler/slotted hinge action using a 25/50% for the transmitter setting. I installed dimension engineering lights in the wings for NAV lights. I’ll discuss later about the ten leads extending out of the wings. I installed the same Hitec servos on the elevator/rudder/nose steering with their included plastic arms. They are beefy and rugged so I chose to keep them vs using metal control arms. I also made this choice because I changed the control horn clevises to 2-56 clevises with the retaining clips on all surfaces with threaded rod on the wing and the kit included rods for rudder and elevator. I also used EZ connectors at the rudder and elevator servo vs using Z-bends. I chose to trash the included pilots due to their cartoonish and cheesy look. Instead I installed two pilots from Adam Martin at Scale Warbird Pilots with moving heads. I have them on a Y-cord at this time plugged into a Spektrum X-plus module and tied into the rudder channel. The low resolution of the module makes the head movement more realistic. I am a scale guy so I also chose to modify the prop and power setup. Since all of my planes are 6S, I’m using the Rimfire 1.20 540 kv with a 4-blade Vario Prop from Christian Ramoser - 12C 13” blades. I also purchased a custom spinner from Dave Brown to fit my prop which he was familiar with. I’m using a Castle Creation Talon 120 ESC with included bullets mounted inside the fuselage nose area with 6 bolts on the BEC. I used anodized Seacraft aluminum spacers to install the the motor for proper cowling standoff. The included air vent and canopy was attached using clear silicone from Loctite. The pilots were cut to fit and installed in place with Velcro. I place control sticks that I had laying around inside the cockpit as well. The tricky part of this whole build: how to install all of this wiring and still be able to transport it to the field without having to spend all day connecting wires. I am using a Spektrum DX-20 transmitter and installed a 9 channel telemetry receiver with an X-plus module. Each function has its own dedicated channel with the lights, the pilots and the retracts being on the X-plus. Rudder, elevator, brakes, steering, flaps, ailerons all take up the 9 slots on the receiver. I chose to place the receiver with the module and JP Hobby retract controller on the wing saddle area. The satellites were run down the wing just past the flap servos on both left and right wing halves and the third was placed using Velcro just forward of the light controller. I used Dimension Engineering lights for the wings. That’s ten leads coming out of the wings and 7 out of the fuselage. Any extensions needed were fabricated vs buying standard fixed lengths. When I was prepared to mate the wing to the fuselage, the kit included nylon blind nut broke loose so I punched the remaining one out and installed a 10/32 metal blind but in using epoxy and metal flat tip bolts with fender washers to retain the wing. I installed only a few of the decals (all kangaroos go forward!). The Aussies were adamant about this online! The covering was tight and defect free and the added stickers give it a nice scale touch. I’m not particularly keen on the grey wheel wells or having my gear exposed to sight while retracted, but I’ll try to mask it with flying and maybe paint them accordingly at a later date.”
How would you rate the overall quality of the product?
Very Low
Okay
Very Good
How would you rate the value of the product for the money?
Very Low
Okay
Very Good
How difficult or easy is the product to assemble, use, or operate?
Very Difficult
Average
Very Easy
How well does the product perform / function?
Very Weak
Okay
Very Good
“The aircraft arrived well packaged and free of any defects. I originally purchased it with the intent on changing the scheme to the military grey with subdued markings, but decided against it with the help of my significant other highlighting that I have enough “grey military aircraft”. I tackled the landing gear first. Retract units weren’t available at the time of purchase so I had to use JP Hobby 90 size retract units and struts which come with brakes. In order to get these all to fit, I had to soft mount them to ensure the correct AoA on ground was efficient - which meant that the main gear struts had to be cut down and the nose gear modified to work. Additionally I had to fabricate a nose gear centering system out of small springs and washers so that the pull/pull style strut would center on gear retraction. I originally wanted to install nose gear doors, but due to my electric power choice and desire to keep weight low, I went with the included wheel well moldings on both the main and nose gear. I installed the moldings with clear waterproof silicone and had to slightly Dremel out the wing area to accommodate the main gear trailing link struts and wheels. I installed Hitec HS-5645 servos on the flaps and ailerons. I used Dubro pinned hinges on the ailerons vs the included superglue hinges. IMHO - those hinges aren’t meant to last and not a good choice on a plane of this size. When installed correctly, pinned hinges can have a minimal gaps as well. For the flaps I installed Fowler hinges on the underside in order to achieve a Fowler/slotted hinge action using a 25/50% for the transmitter setting. I installed dimension engineering lights in the wings for NAV lights. I’ll discuss later about the ten leads extending out of the wings. I installed the same Hitec servos on the elevator/rudder/nose steering with their included plastic arms. They are beefy and rugged so I chose to keep them vs using metal control arms. I also made this choice because I changed the control horn clevises to 2-56 clevises with the retaining clips on all surfaces with threaded rod on the wing and the kit included rods for rudder and elevator. I also used EZ connectors at the rudder and elevator servo vs using Z-bends. I chose to trash the included pilots due to their cartoonish and cheesy look. Instead I installed two pilots from Adam Martin at Scale Warbird Pilots with moving heads. I have them on a Y-cord at this time plugged into a Spektrum X-plus module and tied into the rudder channel. The low resolution of the module makes the head movement more realistic. I am a scale guy so I also chose to modify the prop and power setup. Since all of my planes are 6S, I’m using the Rimfire 1.20 540 kv with a 4-blade Vario Prop from Christian Ramoser - 12C 13” blades. I also purchased a custom spinner from Dave Brown to fit my prop which he was familiar with. I’m using a Castle Creation Talon 120 ESC with included bullets mounted inside the fuselage nose area with 6 bolts on the BEC. I used anodized Seacraft aluminum spacers to install the the motor for proper cowling standoff. The included air vent and canopy was attached using clear silicone from Loctite. The pilots were cut to fit and installed in place with Velcro. I place control sticks that I had laying around inside the cockpit as well. The tricky part of this whole build: how to install all of this wiring and still be able to transport it to the field without having to spend all day connecting wires. I am using a Spektrum DX-20 transmitter and installed a 9 channel telemetry receiver with an X-plus module. Each function has its own dedicated channel with the lights, the pilots and the retracts being on the X-plus. Rudder, elevator, brakes, steering, flaps, ailerons all take up the 9 slots on the receiver. I chose to place the receiver with the module and JP Hobby retract controller on the wing saddle area. The satellites were run down the wing just past the flap servos on both left and right wing halves and the third was placed using Velcro just forward of the light controller. I used Dimension Engineering lights for the wings. That’s ten leads coming out of the wings and 7 out of the fuselage. Any extensions needed were fabricated vs buying standard fixed lengths. When I was prepared to mate the wing to the fuselage, the kit included nylon blind nut broke loose so I punched the remaining one out and installed a 10/32 metal blind but in using epoxy and metal flat tip bolts with fender washers to retain the wing. I installed only a few of the decals (all kangaroos go forward!). The Aussies were adamant about this online! The covering was tight and defect free and the added stickers give it a nice scale touch. I’m not particularly keen on the grey wheel wells or having my gear exposed to sight while retracted, but I’ll try to mask it with flying and maybe paint them accordingly at a later date. Vertical and horizontal stabilizers were installed using 5 minute epox”
“I have been building RC models for over 40 years and was happy when Motion RC finally got Black Horse Models. The fit and finish of this aircraft is very good. and the cowling and general build is good.The covering is also very good. Unfortunately the hardware including the push rods and clevises, is very poor in that it is I feel a bit flimsy for an aircraft of this size. The motor mounting bolts were too short and I had to replace them and all of the clevises with metal ones. I was lucky enough to have all of the required hardware in my spares box but for a model of this price I would expect better. Out of the 4 balsa ARF kits , Hanger 9, Seagull and Phoenix this kit comes in at 4th place. I am powering this model with a Rimfire 1.60 80 amp electrofly ESC HV and 10 cell 5000 mah.I have not flown the model the yet.With better hardware I would justify the price. I feel it is a little overpriced considering what needs to be up graded. In the end it looks good and should fly well”