How would you rate the overall quality of the product?
Very Low
Okay
Very Good
How would you rate the value of the product for the money?
Very Low
Okay
Very Good
How difficult or easy is the product to assemble, use, or operate?
Very Difficult
Average
Very Easy
How well does the product perform / function?
Very Weak
Okay
Very Good
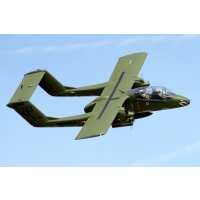
“After receiving the Bronco and scratching my head I reviewed the updated Motion build video.. This being the 6th aircraft , I found it very helpful..After 6 flights ,I found it to be a little lacking in the speed arena.. I have the P-38 and was considering that maybe a prop update may be in the Broncos future.. One note that pilots need to do is when testing the stall have plenty of air under you. Mine snapped over on the right wing. Dove down ward building speed, slowly feed in elevator. And as you pull out feed in power..Take offs are straight forward, but landings have been a little fun as its hard to get both props synced, one always shuts off first no matter how many times I reset to throttle.(?) I really like the looks of the plane but wished they would of made the dual antennas.. All in all a pretty good looking and flying plane. Now how about a Cougar /F7/ F100?”
How would you rate the overall quality of the product?
Very Low
Okay
Very Good
How would you rate the value of the product for the money?
Very Low
Okay
Very Good
How difficult or easy is the product to assemble, use, or operate?
Very Difficult
Average
Very Easy
How well does the product perform / function?
Very Weak
Okay
Very Good
“I recently submitted a product review for my original Flightline OV-10 Bronco. Unfortunately, after only 6 flights I crashed it due to what I believe to be a faulty gyro unit I installed separately. I had to re-build it since seeing the Bronco in full landing configuration; wheels down and four panel flaps deployed with those short wings is quite a sight. I was able to salvage all the servos, motors, ESC, landing gear, MCB Blue box, ribbon cables and the outer wing panel MCB ribbon cable connector plugs. I bought all the major sub-assemblies; center main fuselage, left / right booms, main wing and outer panels, horizontal stabilizer, cockpit canopy set, left / right sponsons, a screw set and push rod set. If anyone is having to do a major re-build as I did, here are some small hints.1. Label each servo, servo plug, ESC plug, landing gear and servo extension before you begin to thread the wires through the center wing and booms. It will save you plenty on having to guess which lead plugs into where later. 2. All the sub assemblies have the servo pockets and covers installed. The elevator, rudder, flaps and ailerons are pre-hinged with the control horns and ball links attached. The left boom has the elevator servo wire and LED wire lead factory pre-installed. The outer wing panels have the wing tip LEDs pre-installed. The plastic landing gear mounts are pre-installed in the center main fuselage and right / left booms. The nose wheel steering servo mount is also factory installed.3. Using the go get'em wire makes wiring everything through the center wing fairly straight forward. The rudder servo leads are long enough the straight enough to drop through the booms from the servo pockets. 4. I bypassed the Blue Box (MCB) since I wanted to reduce the amount of wires coming out of the center wing area. I used (2) long Y harness leads, one for the ailerons and one for the outboard flaps instead of the ribbon wire harness. The ribbon wire harness weighs 77 grams and seemed like alot of wires for just the aileron and outboard flaps. I plugged the aileron lead directly into my receiver, similar to the elevator lead. The outboard flap lead plugged into the tri-lead, which already has the 2 inboard flap leads plugged into it. I plugged the flap lead directly into my receiver. 5. I added a Y harness for both rudder servos and plugged that lead directly into the receiver.6. The MCB is still functioning, controlling the landing gear, nose wheel steering and LED lights.7. The pushrod set includes the ball link snap connector and the servo arm keeper. NOTE: The following items do not come with the major sub assembly replacement parts:1. The center line fuel tank and center line mount are not included with the right / left sponsons, even though the page reads fuel tank set. The plastic machine guns are separate included with plastic part set C package.2. The nose pitot tube for the center fuselage is sold separate with plastic part set B package.3. The landing gear covers are not included with the main center fuselage or the right / left booms. Brad from MotionRC e-mailed me and said these items are not currently available. It may take approximately 4 months to get these covers. So, if you can salvage the ones you have or you will need to fabricate your own for now.Overall the re-build using the spare parts was a success. All the parts fit just as in the original kit. Watching the wiring video by James at MotionRC is really helpful in getting everything plugged in correctly the first time out. First test flight was a success and the Bronco flew just as the original.”
How would you rate the overall quality of the product?
Very Low
Okay
Very Good
How would you rate the value of the product for the money?
Very Low
Okay
Very Good
How difficult or easy is the product to assemble, use, or operate?
Very Difficult
Average
Very Easy
How well does the product perform / function?
Very Weak
Okay
Very Good
“I have not flown the OV-10 yet so will just talk about the build. First off the assembly was fairly easy until you get to the wiring. Motion needs to upgrade the instruction manual by at least 4 or 5 pages to include wiring! Between emailing support, watching YouTube videos and going through the squak threads I think I finally have the info to get it wired up properly. Elevator, Flaps and Throttle all go directly to the receiver but it does not tell you any of that. nor does it explain how to sync the motors. The Instruction manual gets a rating of 2 now. It really needs to be redone. Here is a quote from the Blue box explanation. Please note that when the AUX Channel is used as a throttle channel to access the throttle channel on the receiver. ..... What???? I am sort of new to the electrics but have been flying for over 20 years. I have never been so confused by instruction as I was with this model instructions. Motion, Please take the time to rewrite your Instruction/Assembly Manual!! Please also include a very specific and step by step explanation of syncing the motors. This is my first twin electric. I am clueless as to how to do this and the instructions are no help. Overall I am happy with this OV-10 but wish I had been able to get it in the air much sooner.”
How would you rate the overall quality of the product?
Very Low
Okay
Very Good
How would you rate the value of the product for the money?
Very Low
Okay
Very Good
How difficult or easy is the product to assemble, use, or operate?
Very Difficult
Average
Very Easy
How well does the product perform / function?
Very Weak
Okay
Very Good
“Well made and visually very stunning. Marred by a esc failure on the fifth flight. replaced broken rt prop, provided by Motion RC, replaced esc and aircaft flys well. Motion is sending me a replacement esc. Very robust landing gear that has survived several hard landings due to windy conditions.”
How would you rate the overall quality of the product?
Very Low
Okay
Very Good
How would you rate the value of the product for the money?
Very Low
Okay
Very Good
How difficult or easy is the product to assemble, use, or operate?
Very Difficult
Average
Very Easy
How well does the product perform / function?
Very Weak
Okay
Very Good
“Great plane even though I crashed 1st flight.Pilot error. Too eager to get in air and didn't set low rates or follow instructions on control surface deflections. So it was way too responsive during msiden and rolled over int to unrecoverable dive as turning to land.New pilot section and nose gear arrived and all almost back together. Pilot and canopy out of stock so fixed original as much as possible.To more easily wire, remove blue board, place center wing as close to fuselage as possibe and pull wires all the way through fuselage into battery area. Then much easier to make connections. I would never attempt to wire with blue board in place.”