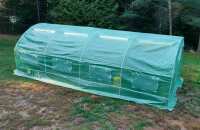
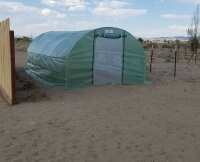
Thank you for an excellent product! My entire experience was handled by Kelly. She was awesome, dependable and helped me all the way thru the entire process from questions, ordering and following up on shipping. I cannot say enough good things about what an asset she is to your business. This greenhouse is awesome and durable. It has been up for 4 1/2 months. It has survived the southern winter and still looks brand new! I have not had any issues, not even with the zippers. The 2 doors are definately worth getting with the 5 rollup windows on each side. This allows great air flow. I had a total of 3 people, including myself setting up the greenhouse. Directions were easy to read and set up went quick. I wanted the greenhouse a little taller so I would have no trouble moving around on the sides so we sat it on concrete block and 2x6s....in the end this greenhouse is NOT going anywhere. We also added 6mil plastic on the inside to assist with keeping it warmer. After we put the greenhouse up, I also ordered an extra cover for when the time comes for it to be replaced as this greenhouse will stay up year around. Below, I have included details and pictures on how we stabilized and anchored the greenhouse so it will never move and also how we added plastic to the inside. You will see that when we buy something we definitely look for ways to make the most of it so it will last as long as possible. It will be staying up year round.
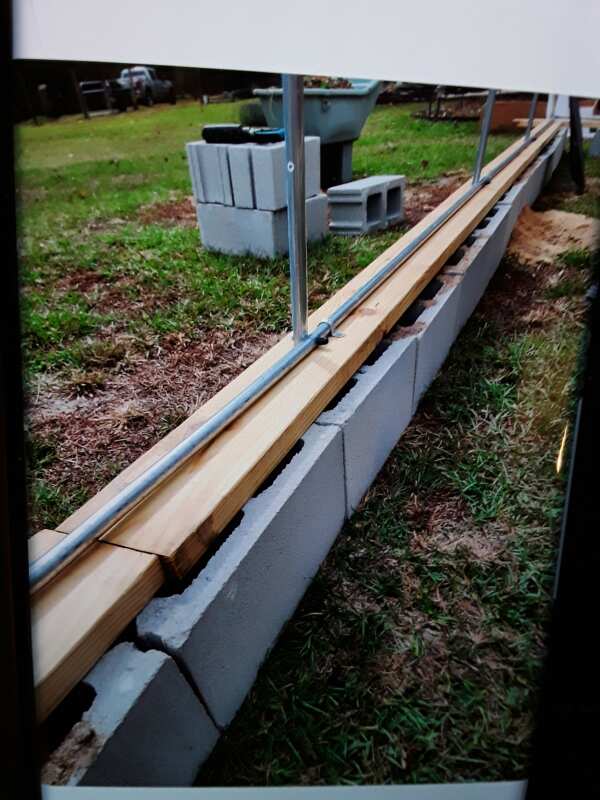
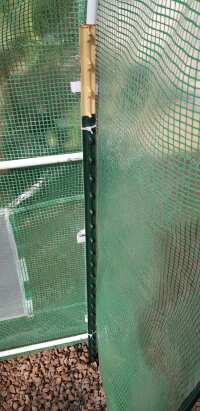
We laid out concrete blocks, the size of the greenhouse. Then, we laid 2x6 treated lumber on top of blocks. Then, we put together the greenhouse frame on top of the 2x6 treated lumber and then put the cover on. Next, we tightened all the hardware on the greenhouse frame and put the rubber covers on the end of the bolts. I also put heavy duty duck tape around all screws to provide extra protection from possible rubbing of the frame and cover (thanks to a previous review). (Some things we done may be overkill but it will last much longer. ) We then used 3/4 inch EMT 1 hole straps and fastened frame to treated lumber approximately every 4 feet. Next, we fastened the side of the greenhouse skirt. We used 1 inch wood screws with washers and we screwed through a frame furring strip into the skirt and thru the 2x6 treated lumber on the 1 1/2 inch side of the treated lumber every foot around entire greenhouse except for the 2 doors. We then drilled 1/2 inch holes thru the 2x6 lumber on the inside of the greenhouse to where it would go thru the cavity of the block. We drilled 3 holes on both of the long sides of the greenhouse. Then, used 3ft of 1/2 inch rebar and welded a washer on one end. Next, took those 6 pieces of rebar and drove each one down thru the drilled hole to where the washer was resting on the treated wood. We used the rebar to provide extra strenth as it is next to an open field and gets strong gusts at times. I would suggest everyone to use the rebar as my greenhouse has NEVER moved! It is still in excellent condition.
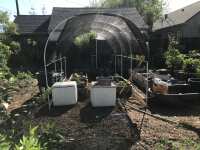
Due to cold weather, we put 6 mil plastic inside the greenhouse and used 1 inch pvc pipe and zip ties. This plastic has made a huge difference with heating. To hold the plastic up my father invented a genius idea. To hold the plastic up we put 3 sticks of pvc pipe the length of the greenhouse and used zip ties every 4 ft to attach. We put a small slit in the 6 mil plastic and then took a ziptie and went thru the slit around one of the long lengthwise runners. The ziptie went over the metal of the greenhouse frame between the frame and greenhouse cover and then came back thru the other slit on the opposit side of the pipe and fastened the ziptie. This left a 4 inch air space for heating and cooling the greenhouse.